

Hey guys! We're excited to be back & share with you a simple project to give a laundry room a little bit of extra charm! We were out shopping a couple weekends ago and got the idea from something we saw, but it was $30 (and something we knew we could easily knock out!). We bought some $1 picture frames from Ikea probably a year and a half ago, knowing that we would eventually put them to good use. Seriously, a simple project anyone of almost any age can do... so have fun!
Materials:
Home-made stencil (free)
Paint & household sponge (we used black acrylic paint, but you could probably get a similar effect with markers)
Thick, textured paper (we used some pages from Sheena's sketch book)
8.5 x 11" picture frames (ours were $1 each)
Scrap Burlap (it's super cheap!)
1) Use a stencil, or print one from the inter webs :)
We used RapidResizer.com to input the text and print the stencil, as shown. Use an x-acto knife or flat razor, BE CAREFUL. This isn't the part for kids to do, ask a parent for help.


2) Using thick pieces of paper, gently (and lightly) tape your stencil in place as you blot the letters with sponge & paint. Be very careful not to over saturate the sponge! DON'T WIPE!

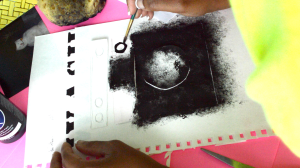
3) On a completely new piece of paper (printer paper is fine) free-hand sketch the washer & dryer (or you could probably find an image online & print it to be used as a stencil). You can also find stencils at your local hobby store. Repeat what we did for the text in step 1 by cutting out the sketch to be used as a stencil.


Using the sponge, lightly blot paint onto the paper underneath. For different designs, you may find it easier to simply free hand paint your design. Totally up to you!

Once you're done with your design, allow your artwork to dry.
Next, lay the picture frame on your burlap sheet & trace around the edges. Following the lines you've just drawn, cut out the burlap that will be used in the picture frames.

Using a hot glue gun (not absolutely necessary), glue the burlap to the frame's backing & trim up any excess edges

Once this is complete, it's time to crinkle the artwork you just created (make sure its dry though)! We squished our paintings into a ball & opened it back up, only to squish it again and again... until you've reached the desired look. We're going for a 'weathered' look, so when you've reached that point, it's time for the next step. You're going to LIGHTLY dab the hot glue onto the back of your painting, then place in the center of your burlap frame backing.


Next, simply put the frame back together & your project is finished!

We hope you enjoy making your own frames, & be sure to show off/share with us what you've created! As always, we appreciate all of the support and great feedback!
Don't forget to stop by our 'Before & After' tab, to see some of the furniture/room makeovers we've completed so far!
Love in the details,
SpokenHome.