Trip to NYC…. engagement!


IMG_7334

It's finally official, we're engaged! A couple weeks ago we took a trip to New York City for a few days. Sheena is from Brooklyn, so I knew it would be extra special to propose while we were there.

IMG_7325


IMG_7289

( Above: Dustin trying the famous Lucia's in Queens, NY )

So that there is no confusion, this is Dustin writing today's blog post & I wanted to recap our awesome week in New York from my perspective. Lots of planning and patience went into making this happen (and surprisingly I didn't goof anything up)! I picked up the ring a couple days before we flew out, but had absolutely no idea when, where, or how I would propose. I thought about in Times Square... but not really romantic. Then there is the classic proposal after dinner.... well every time we went out to eat, it was crowded, loud, basically not even remotely romantic. For four days, I walked the streets of Manhattan with Sheena, and her ring in my pocket (constantly checking to make sure it was still there)!

IMG_7185

IMG_7205

IMG_7194

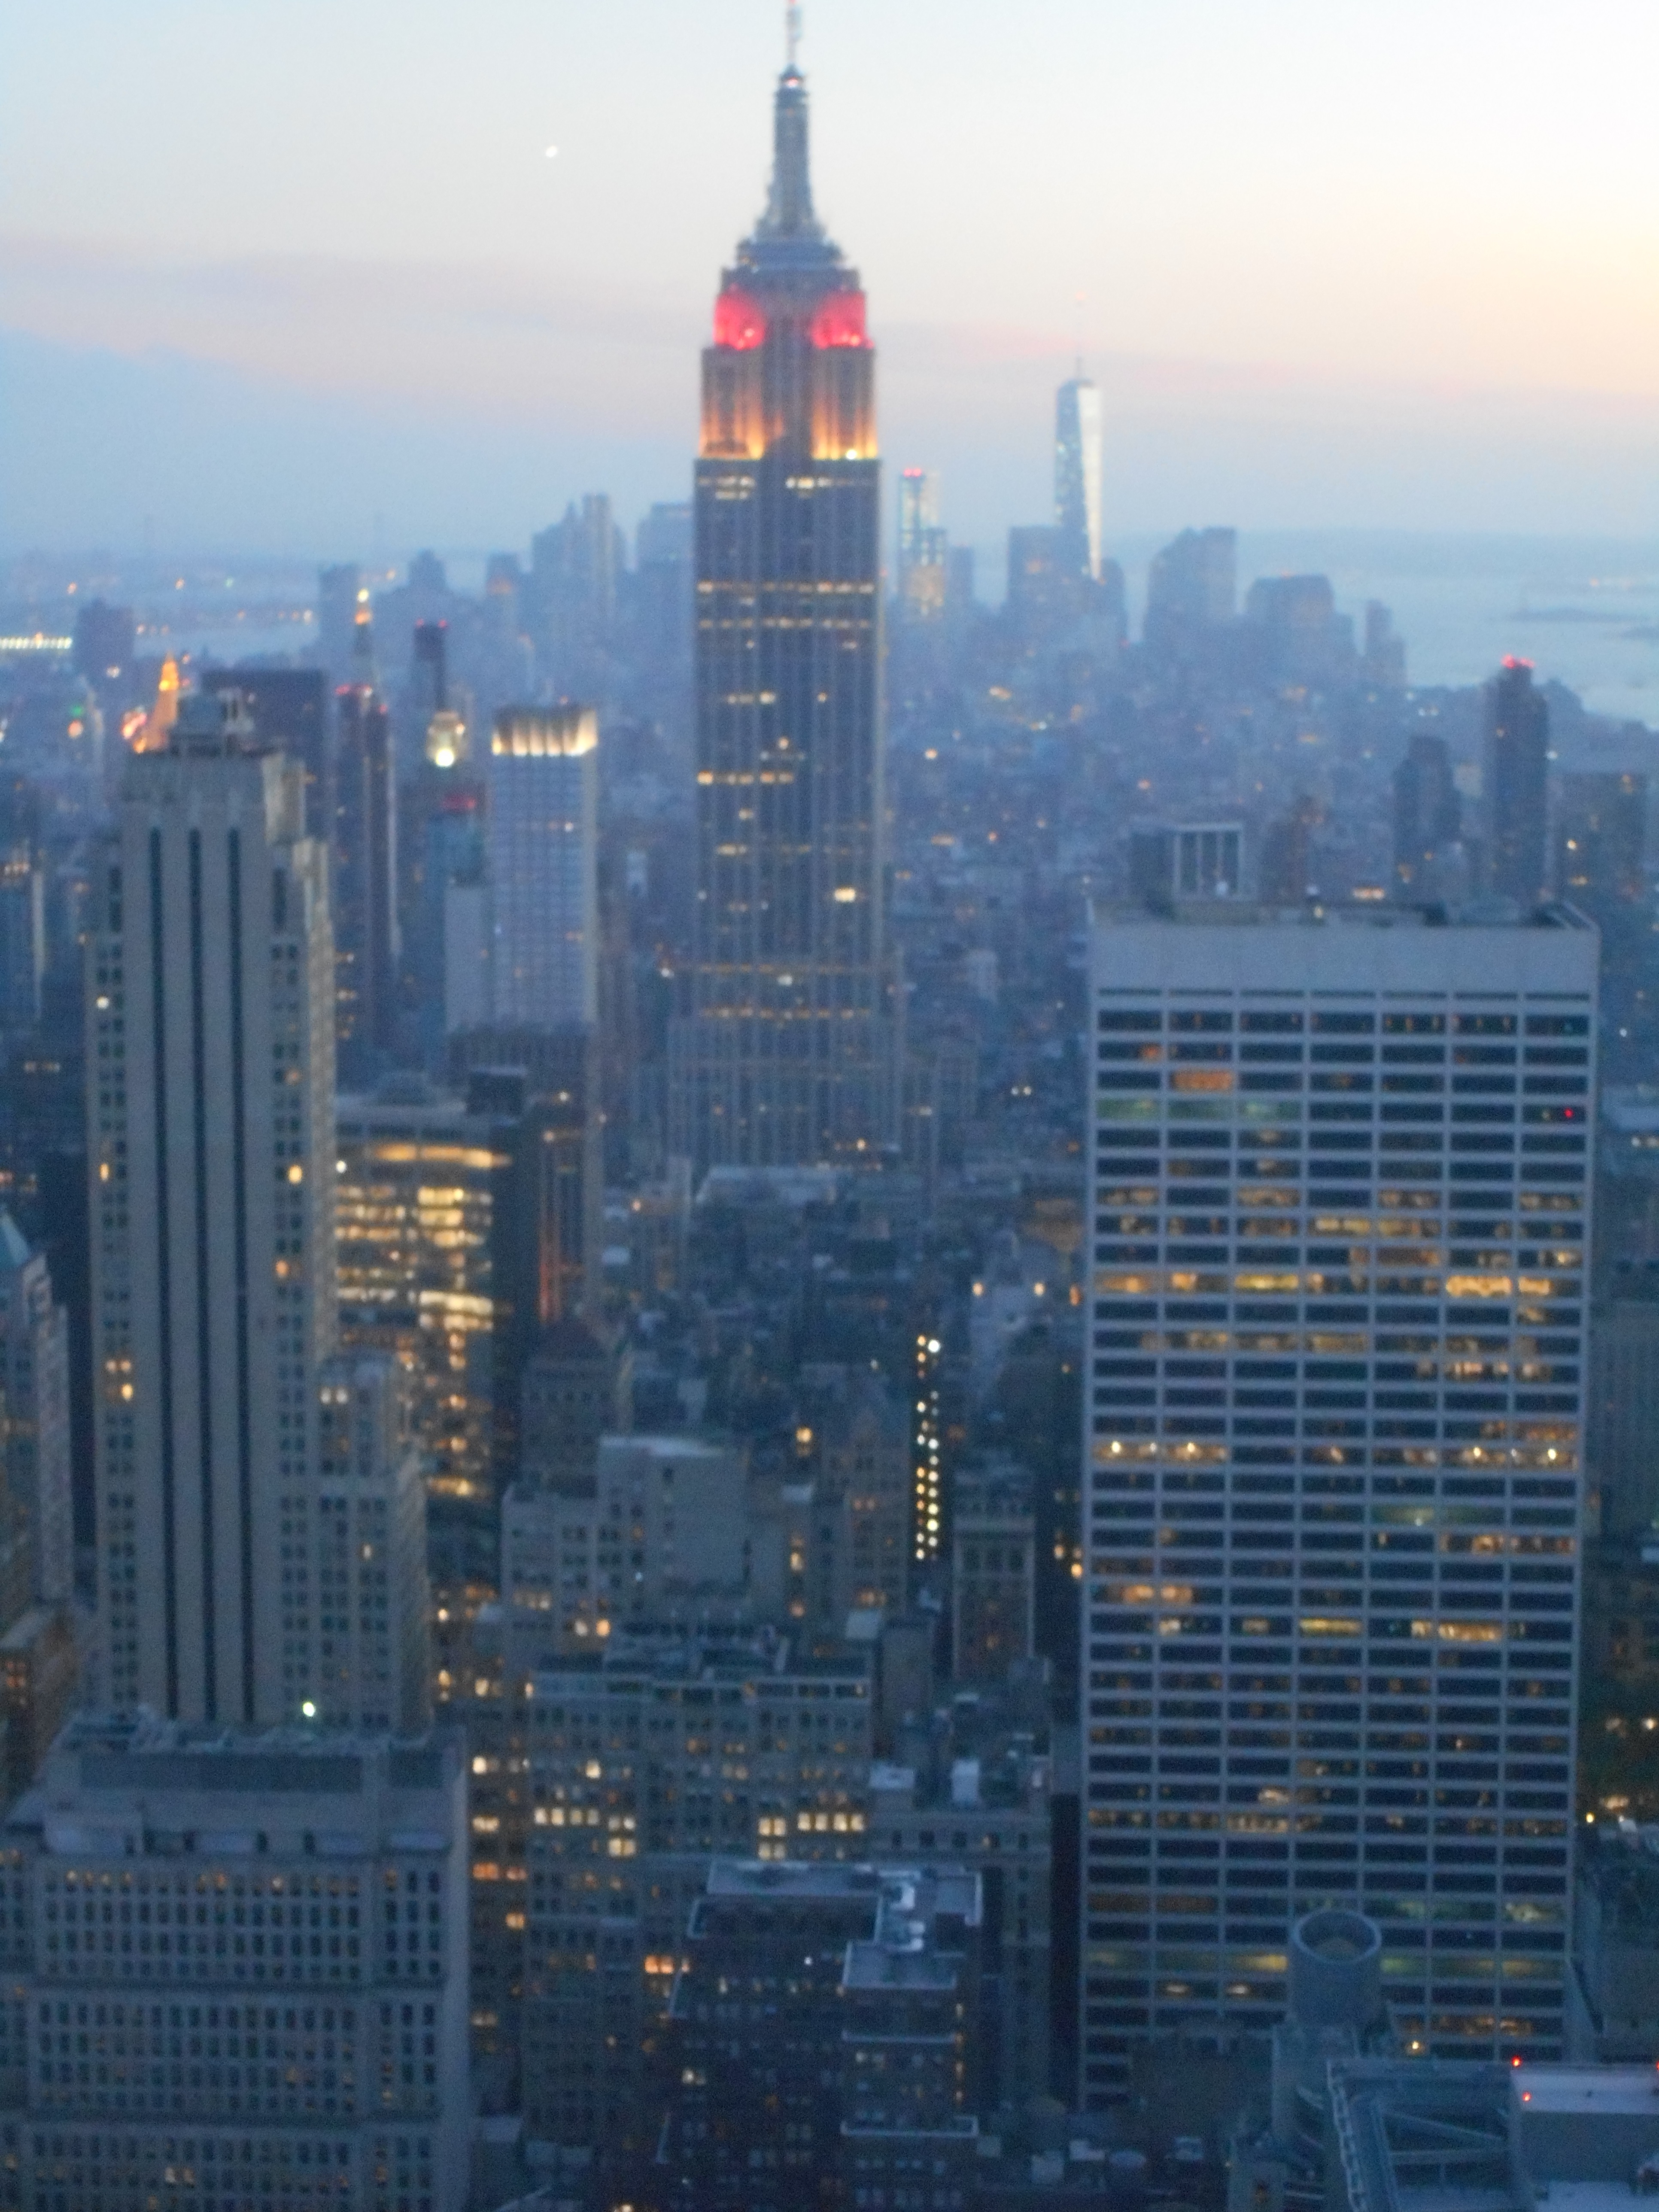
One of our close friends recently got engaged and we texted back and forth, but finally he mentioned "Top of the Rock," so I googled it and thought "That's it!" Friday evening, we made our way over to 30 Rockefeller Plaza to buy tickets and go to the top... except it was a Friday night in NYC. Only 4 hours to wait and take a ride to the top :( So we left and bought tickets for the following evening.

All this time, Sheena thought I just wanted to go do some tourist stuff, Top of the Rock only one of them. It was tough not giving it away (had to fake an indifferent attitude so that she wouldn't suspect anything). Next challenge? Where to hide the box. Luckily there were a few items we needed to exchange at H&M, so I hid it at the bottom and carried our bags all day long…. gripped tight!

Finally, we made it to the Top of the Rock & I wasted no time. As Sheena shuffled for a good place to take photos, I asked a random tourist to hold my camera, as I was about to propose. Didn't even catch his name, but so appreciative that he was willing to help with the moment. We began backing up to pose for a photo, then I stopped. Nervous, I fumbled for a moment in the bag I had been carrying all day, and dropped to one knee (she initially thought I was tying my shoe (: ).

IMG_7332

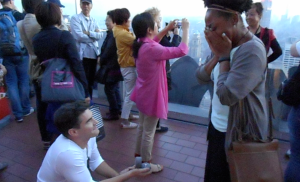
"I wanted to know if you will marry me?" I opened the box, and she began to sob! A few seconds pass, then she nods "yes" several times but couldn't find the words. So much for speeches, but we both knew already how much this moment meant to one another. Words couldn't begin to describe anyhow!

IMG_7217

Surprisingly, only a small handful of people realized what was taking place! I must admit, the view was pretty spectacular. Over the next hour, we watched the sun set over NYC. I am sure it will be one of the most memorable nights of our lives. Now, time to save, save, save for our wedding!

DSCN0041

IMG_7211

DIY Laundry Room Pictures (Under $10!)

burlap

Hey guys! We're excited to be back & share with you a simple project to give a laundry room a little bit of extra charm! We were out shopping a couple weekends ago and got the idea from something we saw, but it was $30 (and something we knew we could easily knock out!). We bought some $1 picture frames from Ikea probably a year and a half ago, knowing that we would eventually put them to good use. Seriously, a simple project anyone of almost any age can do... so have fun!


Materials:
Home-made stencil (free)
Paint & household sponge (we used black acrylic paint, but you could probably get a similar effect with markers)
Thick, textured paper (we used some pages from Sheena's sketch book)
8.5 x 11" picture frames (ours were $1 each)
Scrap Burlap (it's super cheap!)


1) Use a stencil, or print one from the inter webs :)
We used RapidResizer.com to input the text and print the stencil, as shown. Use an x-acto knife or flat razor, BE CAREFUL. This isn't the part for kids to do, ask a parent for help.


Screen Shot 2014-08-12 at 5.37.12 PM


Screen Shot 2014-08-12 at 5.49.44 PM


2) Using thick pieces of paper, gently (and lightly) tape your stencil in place as you blot the letters with sponge & paint. Be very careful not to over saturate the sponge! DON'T WIPE!


Screen Shot 2014-08-12 at 5.52.09 PM


3) On a completely new piece of paper (printer paper is fine) free-hand sketch the washer & dryer (or you could probably find an image online & print it to be used as a stencil). You can also find stencils at your local hobby store. Repeat what we did for the text in step 1 by cutting out the sketch to be used as a stencil.


Screen Shot 2014-08-12 at 6.03.03 PM


Screen Shot 2014-08-12 at 6.03.34 PM


Using the sponge, lightly blot paint onto the paper underneath. For different designs, you may find it easier to simply free hand paint your design. Totally up to you!


Screen Shot 2014-08-12 at 6.04.40 PM


Screen Shot 2014-08-12 at 6.05.01 PM


Once you're done with your design, allow your artwork to dry.


Next, lay the picture frame on your burlap sheet & trace around the edges. Following the lines you've just drawn, cut out the burlap that will be used in the picture frames.


Screen Shot 2014-08-12 at 6.09.09 PM


Using a hot glue gun (not absolutely necessary), glue the burlap to the frame's backing & trim up any excess edges


Screen Shot 2014-08-12 at 6.09.46 PM


Once this is complete, it's time to crinkle the artwork you just created (make sure its dry though)! We squished our paintings into a ball & opened it back up, only to squish it again and again... until you've reached the desired look. We're going for a 'weathered' look, so when you've reached that point, it's time for the next step. You're going to LIGHTLY dab the hot glue onto the back of your painting, then place in the center of your burlap frame backing.


 Screen Shot 2014-08-12 at 6.12.25 PM


Screen Shot 2014-08-12 at 6.12.32 PM


Next, simply put the frame back together & your project is finished!


Screen Shot 2014-08-12 at 6.13.18 PM


 We hope you enjoy making your own frames, & be sure to show off/share with us what you've created! As always, we appreciate all of the support and great feedback!


Don't forget to stop by our 'Before & After' tab, to see some of the furniture/room makeovers we've completed so far!


Love in the details,


SpokenHome.

How to Handle Debt!

http://www.youtube.com/watch?v=dqFan7hUJVo

Several of our YouTube subscribers asked for a video with tips for getting out of debt so we thought we would share some of the ideas we have come across! In a debt-driven society, it can be tempting to pull out the plastic once in a while for wants & needs. Still, certain behaviors will help you gain financial independence and achieve a debt-free life. Where there's will, there's a way! First, we wanted to celebrate the fact that Sheena's first car is now paid off! Financing a car is a serious pain, and unfortunately a terrible "investment," but a necessary evil where we were in our lives when it was purchased. Word to the wise, get a loan through a credit union in your area (MUCH LOWER RATES!) We're looking forward to that extra money coming in every month that we can put into other debts to continue the "Snowball"!

120612_Ramsey_Dave_hi

This brings us to Dave Ramsey (if you haven't heard of him, he's got a great youtube channel & website!). Sometimes the truth hurts, and he's not afraid to shoot you straight. Those who practice what he preaches usually find themselves debt free in much less time than they ever thought possible. One of his tips is to use the "envelope system" which we touch on in the video as a great way to help stay on track.


ADMIT THERE IS A PROBLEM THAT YOU WANT TO FIX      


 broken-computer-md


Our first suggestion may be obvious, but honesty with both yourself & your partner is crucial if you want to have a healthy financial life. A great tip that has helped us was to put together a spreadsheet with all of our bills, debt, obligations, and income together (EVERYTHING!) Bills, credit card debt, loans, car payments, rent/mortgage, etc are put together in one place with due dates, and links to the website to pay. It's a great way to stay on the same page with your partner, and helps prevent from accidentally spending money that should have gone towards bills and debt! Obviously, utilities, food, & rent/mortgage take priority over all debts, so pay them first. PUT TOGETHER A MONTHLY BUDGET! We included some tips on the envelope system too. We don't use this method, but if you're having trouble figuring out & sticking to a budget, it's a great one!

ARRANGE DEBTS IN ORDER FROM SMALLEST TO HIGHEST    


   column-chart-th

Once you've taken care of all of your bills for the month, arrange them from smallest to largest. Now is the time to develop a payoff game plan!  While we're stating the obvious, if you've truly made up your mind to get out of debt (specifically credit cards), STOP using them now! Continue to pay minimums on larger debts each month, but focus the bulk of payments towards the smallest balance debt. This is called...

SNOWBALLING!    


  seasons_snowball

Once they're out of use and all of your basic necessities are budgeted for, allocate the leftovers to begin paying down some balances! Take your lowest balance and apply as much to that card as possible each month. When it is completely paid off,  keep going to the next card with the smallest balance. Continue to apply leftover money each month to its balance... and before you know it, you'll have paid off 2... continue the trend for as long as it takes! As you progress, you will begin to see things picking up pace. The next step is extremely important to ensure you stay motivated...

CELEBRATE THE WINS!    


  dancing-people-th


Don't forget to celebrate the wins when you can. After all, life is short & we all need to have fun from time to time. We personally haven't gone to the rice & beans diet yet ;) but even if you want to pay things off extremely quickly, always remember to celebrate life's moments and your achievements! The key is to always budget some time and money for some of life's little joys! For instance, splurge on a nice home cooked meal (Dustin loves to grill fillets :) Be creative while saving some money!


Hope these tips have been helpful, please share some of your best practices for budgets & debt reduction with us! There's so many ways to minimize debt, we would love to hear what works best for you!

DIY Up-Cycled Pallet Wood Planter

IMG_6478


There are hundreds, if not thousands of FREE ideas using pallet wood! Here is our most recent project, a portable backyard herb planter! First, we had to locate the pallets that we use, and we're very fortunate to have easy access to high-quality pallets from Dustin's job. MAKE SURE you ask permission, many companies sell these pallets back to recyclers and don't want any of you getting in trouble over some pallets! If your job doesn't have pallets, keep your eyes open the next time you're in a business park! If they look like they're being trashed, simply go inside and ask if you can have them. Another consideration is the kind of treatment the pallets have undergone during manufacturing. Stay away from chemically treated pallets, and look for the symbol that resembles a wheat plant, and the letters HT (heat-treated). These have been kiln heated to kill pests that may have lived inside the wood.

[gallery ids="223,225"]

Once you have the pallet, this project requires you remove the boards and nails. Using a crowbar and hammer is easiest, but sometimes just a hammer to the backside of the board is enough.

Since most pallets are slightly different sizes, determine what dimensions you will use to build the box. Our planks were approximately 31 inches, so we determined that approximately 20 inches x 11 inches made for the easiest box... but don't hesitate to go bigger! We just wanted to keep it fairly portable.

IMG_6449-1 IMG_6448-1

Next, we took a scrap piece of plywood to construct the bottom of the box. One cut was needed to make it 20x11 inches. From there, we simply glue the boards to the plywood one by one, and reinforced with 1 1/2 inch staples. You can also use screws, finishing nails, or any other small fasteners you may have.


IMG_6455-1IMG_6456-1

Once the box is 1 board high, we did the same for a 2nd row to give the box the height we wanted. Although not the strongest option, we toe-nailed the 1st & 2nd layers together to hold the box into place while the glue dries for simplicity's sake. Once the box is complete, flip it over and now it's time to provide some drainage so that roots do not rot when the soil is over watered. We used a 1 inch bit to allow water to drain, and air to circulate. Note, if you don't care about portability, your planter does not need a bottom! Just be sure the ground below is not compacted so that water cannot be absorbed.

IMG_6469-1 IMG_6463-1

Almost complete! Next, we used some landscaping rocks to provide the bottom layer of the box, making sure the holes were not visible from above. Then a layer of potting soil is applied on top of the rocks. Next, take your plants and arrange them, move the soil to drop them in. Last, add one more layer of potting soil so that the tops of the root balls are covered. Give them some water, and enjoy watching them grow!

IMG_6471-1 IMG_6472-1 IMG_6473-1 IMG_6475-1

Get creative, you can grow tons of vegetables, flowers, herbs, etc so that they're never on your shopping list again! We've noticed many grocery stores have begun selling living herbs, so you don't even need to go to the nursery. We're thinking about making several more boxes for some added greenery in the backyard, and excited about all the healthy edible plants we're going to grow this summer!

IMG_6476-1

The Truth About Moving Out

https://www.youtube.com/watch?v=QQQzLfl1N9M

This video was extra fun for us, because we were allowed to be nostalgic for about 30 minutes straight in front of the camera....Then.....had to cut it down to like 11m haha.

We moved out together about 5 years ago, and it was nothing short of 'basic.' Cable was not an option, our only television was about 20in and could only play DVDs. We only had one couch, and our stove was rarely used seeing that our kitchen was the size of bathroom! Needless to say, we went through our 'trials and tribulations' and ended up in much nicer space. After about 3 years of living there and dealing with a bed of dog poop that mixed in with azaleas every AM, and many nights of our upstairs neighbors body slamming each other - it was time to get out own space.

After 2 years of being homeowners, there isn't one thing that we regret, except not doing the process SOONER! :-) The sacrifices that we have had to make (like no vacations, limited gift giving, working long hours, and commuting for endless miles) really showed us what was most important in our lives. Finding peace and our little space in this world. Check out our video and feel free to share any of your own experiences about moving out for the first time! The good, the bad, and the ugly! ;-) As always, thanks the support and the video will also introduce our 1,000 subscriber giveaway on YouTube!

Love in the details,

SpokenHome.

HardBoard Accent Wall

Hey Everyone!

Thanks for stopping by to check out another project. ;-)

We have been running in circles trying to figure out what to do with a bare wall we had in our lounge area entering the second floor of our home. This area currently has a cool faux leather chair (found @ dumpster) and a coffee table that was gifted to us by my mom. Here is the room before our project:

DSC_0051 DSC_0054 DSC_0055

We wanted this area to have a distinguished accent wall color, wallpaper, or just a 'textured' wall covering of some type to create a cool, modern 'lounge' area similar to a tapas bar or upscale office building. About a year ago Sheena purchased several pieces of 'hardboard' or 'masonite' at our local home improvement store for Dustin's office, assuming that it was cork board. Once we got it inside, we realized that it was not what we expected, and tucked the pieces away in a closet to hopefully use again one day. Here is what the hardboard looks like without any alterations and/or cuts:

Image

This became a possible contender for our wall because one side is a smooth cork board look, and the opposite side is almost like a weaved patten. We went back to the store and grabbed about 2 extra pieces that were a darker shade, to create a bit more contrast. Dustin laid them on the table saw and cut them down to 6in in length and kept the width that it was from the store. We ended with a stack of them that looked like tiling or hardwood planks:

Image

Image

We decided to lay them like subway tiles or bricks, with no perfect pattern or repetition. We used 'liquid nails' that comes in the form of a tube, and you would need a caulk gun to force the product out:

Image

We followed up with two 1" staples in each plank, using a compressor/nail gun to apply additional re-enforcement. Can't have panels falling off of the wall during parties! (haha) So once those pieces were cut, we started working from the top left of the wall, and moving forward in a 'reading' style. (left to right, next row down, left to right)

Image

We seriously took several hours to complete this only because we would stop after every row, and just stare at the wall, like "awesomeee, riiiight? ;-)" *high fives* lol.

Image

Image

The hardest part of this project was getting the hardboard planks right against the banister seen above. We didn't want any of the wall showing, and we wanted the wall covering to look as 'organic' as possible, as if the wall was just that way already. We were able to achieve most of it with a dremmel, but it took forever and kept overheating, so we had to call it a night, and head out the next morning to get a jigsaw. And boy, did we get it for a STEAL!

Image


Dustin, putting the final touches on the cut-out for the banister with the dremmel, after doing the major cuts with the jigsaw:

Image


Image

After a few more staples and filling in the final pieces, here is our completed lounge, accent wall!

Image

Image


Image

Can you tell we're pretty in love with it? ;-) Thanks so much for checking out our project, and if you guys try something similar, definitely let us know! We'd love it to see your creation(s)! Until next time, peeeeeace.

Image


Love in the details,

Spokenhome.

Video available at https://www.youtube.com/watch?v=vX31CG2QYHw